How to troubleshoot QuickBooks Desktop has expired issue?

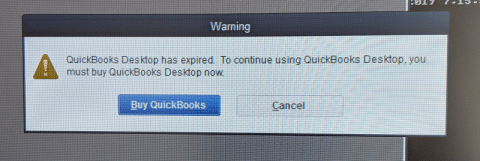
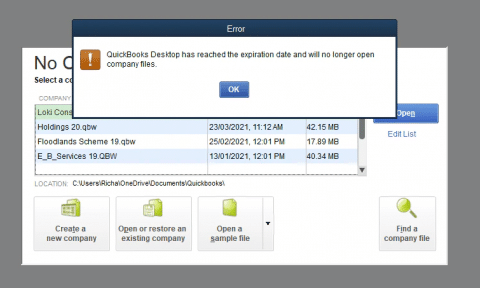
QuickBooks is an effective accounting program. However, various problems can happen, and some need to be clarified. For example, several errors can occur when QuickBooks Desktop expires. Once QuickBooks Desktop is installed on your workstations and host server, you will not have to validate the license. Users have recently complained that they received "QuickBooks Desktop has reached expiration date" errors when accessing the company files.
There are several possible causes of the error message "QuickBooks Desktop has reached its expiration date." Additionally, we will help you with the appropriate solutions to the issue.
Some Causes of the This Error
The following circumstances may result in a QuickBooks desktop has expired error:
- If your software isn't fully registered, a notification saying that the QuickBooks desktop has expired will show up.
- You may get this error if the 30-day trial period expires and you still need to register the software.
- If the license required to register for QuickBooks is invalid, you can experience a similar problem.
- If the organization's files are harmed or corrupted.
Symptoms of the QuickBooks Desktop has Expired Error
- I need help to continue getting internet services and security updates.
- The program locks up.
- The corporate file for QuickBooks won't open.
- Windows is slow.
Methods for Resolving the Issue "QuickBooks Desktop has expired
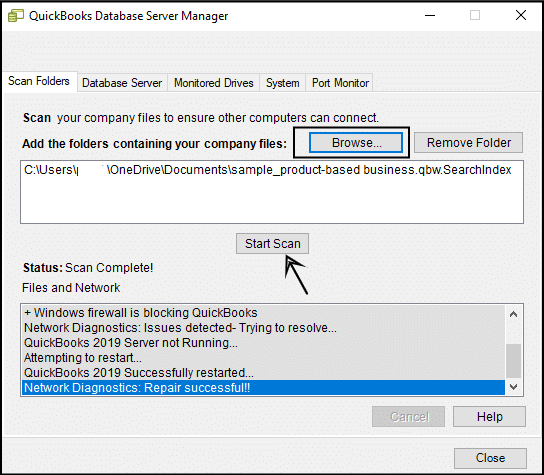
Method 1: Update the Server Manager and QuickBooks Desktop
By selecting Upgrade QuickBooks from the Help menu, you can update the QuickBooks version installed on your desktop. However, if you don't already have QuickBooks installed on your computer and want to do it, then the instructions listed below are for you:
- You must download the most recent QuickBooks version.
- And select the country from the select country option.
- Select the product and version as well.
- Get updates now, and save the downloaded file somewhere you can retrieve it quickly.
- To install the downloaded file, you must open it from the stored place.
- QuickBooks database server management needs updating.
- Start the server again.
- The following message could appear. The company files needs to be updated to be compatible with this edition of QuickBooks desktop.
- You may receive a prompt to make a backup.
- When finished, open the file.
Method 2: Changing the Settings for the Firewall or Other Antivirus Programs
You must manually adjust your firewall and port settings:
- First, go to the Windows start menu and enter "windows firewall" in the Search box.
- Click advanced options after double-tapping the Windows firewall to launch it.
- Later, select port and press next.
- Make sure you select TCP as well.
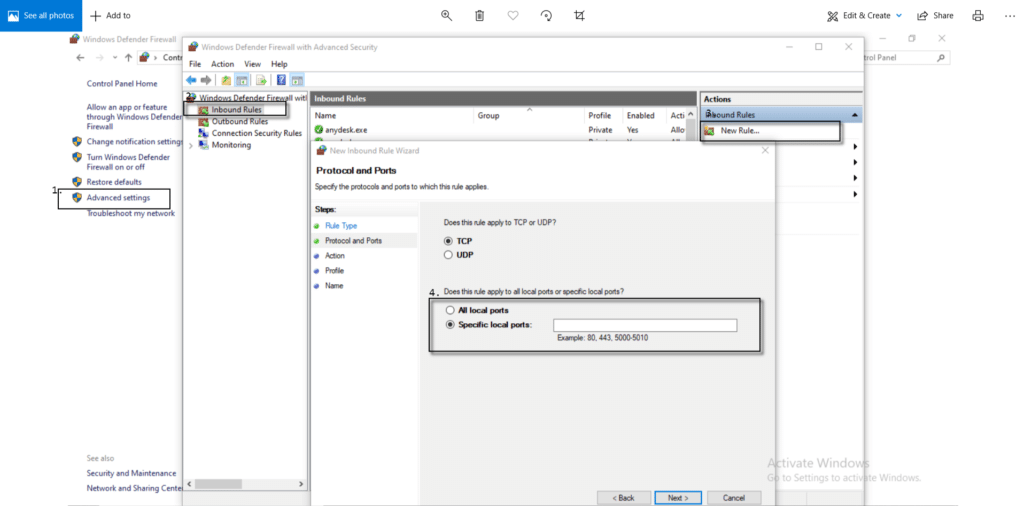
Now, enter the ports in the specific ports field following the QuickBooks year version:
- QuickBooks Desktop 2022: 8019, XXXXX
- QB Desktop 2021: 8019, XXXXX
- QuickBooks Desktop 2020: 8019, XXXXX
- QB Desktop 2019: 8019, XXXXX.
- QuickBooks Desktop 2018: 8019, 56728, 55378-55382.
- QuickBooks Desktop 2017: 8019, 56727, 55373-55377
- The port number should be typed in, followed by clicking the next tab.
- Choose to accept the connection, and then click on the next button.
- After choosing the profiles, hit on the following profile.
- Make a rule with a name like QBPorts.
- A finish tab should then be clicked.
- For outbound rules, the same procedures should be repeated.
Method 3: Apply Using the QuickBooks File Doctor Tool
- You must shut down QuickBooks before downloading QuickBooks Tool Hub.
- Save the file in a location that is also simple to find.
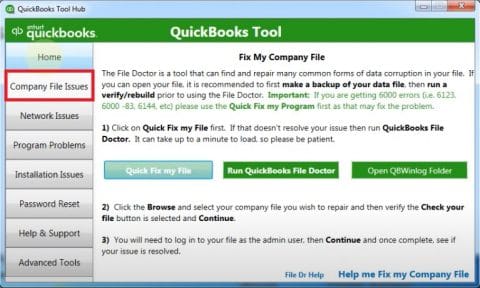
- Open QuickBooksToolhub.exe's location now.
- After approving the terms and conditions, install the tool hub.
- Clicking on the desktop icon created may open the tool hub.
- When the QuickBooks tool hub appears, you must now focus on problems with company files.
- Hit the Run QuickBooks File Doctor button.
- From the drop-down option, select the company files.
- Next, select browse and search to locate the file.
- Check your file now.
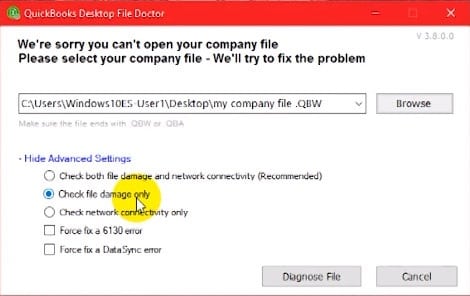
- Click the next tab.
- Hit the next tab after entering the admin password for QuickBooks.
Conclusion
We hope you can resolve the QuickBooks desktop expired issue, so we'll end this article here. We've listed several ways to access the files and remove the pop-up notice about the expiration date. In addition, we have solutions for the described issue. You also have the option to connect with our QuickBooks Support team at 1-800-615-2347 and get assistance.


Comments
Post a Comment